6.4 Positions
| [unchecked revision] | [unchecked revision] |
imported>Gesc No edit summary |
imported>Gesc No edit summary |
||
| Line 1: | Line 1: | ||
It is the second referee's duty to check on the positions of the receiving team. | It is the second referee's duty to check on the positions of the receiving team. | ||
<loop_area type="important">The feet of the players are relevant for determining whether there is a positional fault or not.</loop_area> | <loop_area type="important">The feet of the players are relevant for determining whether there is a positional fault or not. The players have to be lined up correctly at the service hit.</loop_area> | ||
<br /> | <br /> | ||
<hr /> | <hr /> | ||
==== Explanation of the positions ==== | ==== Explanation of the positions ==== | ||
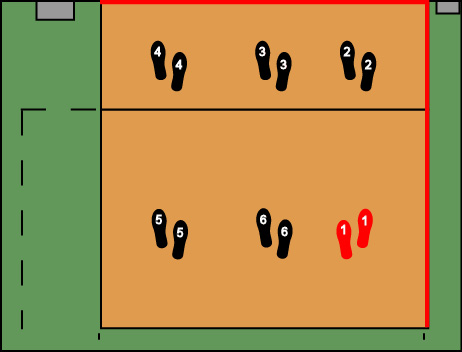
<loop_figure title="Position 1" description="Position 1 must be closer to the right | <loop_figure title="Position 1" description="Position 1 must be closer to the right side line than position 6 and positions 2 must be closer to the center line than position 1."> | ||
[[File:Position1.jpg|link=File:Position1.jpg]] | [[File:Position1.jpg|link=File:Position1.jpg]] | ||
</loop_figure> | </loop_figure> | ||
| Line 11: | Line 11: | ||
<hr /> | <hr /> | ||
<br /> | <br /> | ||
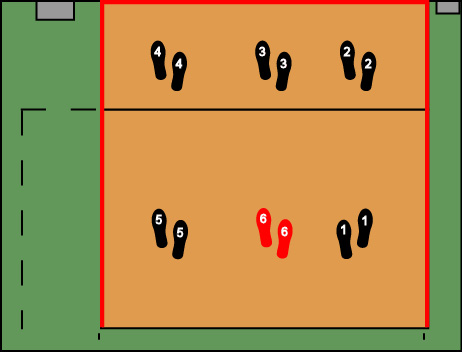
<loop_figure title="Position 6" description="Position 5 must be closer to the left | <loop_figure title="Position 6" description="Position 5 must be closer to the left side line, position 1 must be closer to the right side line and position 3 must be closer to the center line than position 6."> | ||
[[File:Position6.jpg|link=File:Position6.jpg]] | [[File:Position6.jpg|link=File:Position6.jpg]] | ||
</loop_figure> | </loop_figure> | ||
| Line 17: | Line 17: | ||
<hr /> | <hr /> | ||
<br /> | <br /> | ||
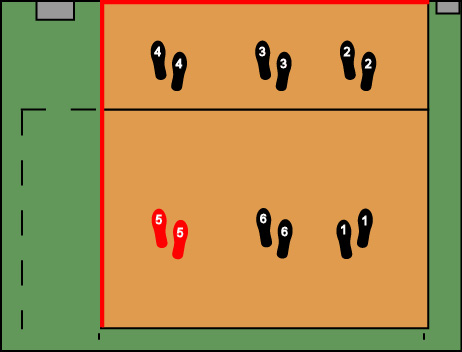
<loop_figure title="Position 5" description="Position 5 closer to the right | <loop_figure title="Position 5" description="Position 5 closer to the right side line than position 6 and position 4 must be closer to the center line than position 4."> | ||
[[File:Position5.jpg|link=File:Position5.jpg]] | [[File:Position5.jpg|link=File:Position5.jpg]] | ||
</loop_figure> | </loop_figure> | ||
| Line 23: | Line 23: | ||
<hr /> | <hr /> | ||
<br /> | <br /> | ||
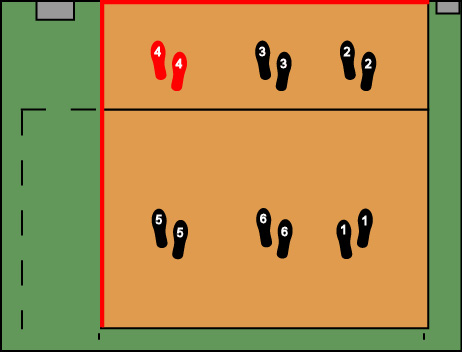
<loop_figure title="Position 4" description="Position 4 must be closer to the right | <loop_figure title="Position 4" description="Position 4 must be closer to the right side line than position 3 and closer to the center line than position 5."> | ||
[[File:Position4.jpg|link=File:Position4.jpg]] | [[File:Position4.jpg|link=File:Position4.jpg]] | ||
</loop_figure> | </loop_figure> | ||
| Line 29: | Line 29: | ||
<hr /> | <hr /> | ||
<br /> | <br /> | ||
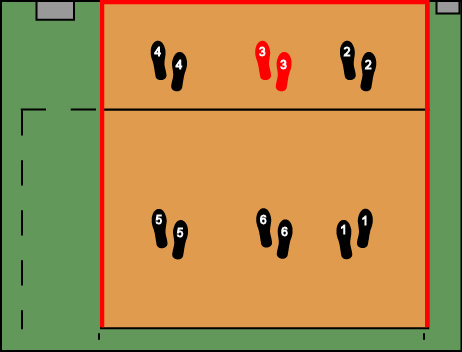
<loop_figure title="Position 3" description="Position 4 must be closer to the left | <loop_figure title="Position 3" description="Position 4 must be closer to the left side line, position 2 must be closer to the right side line than position 3 and position 3 must be closer to the center line than position 6."> | ||
[[File:Position3.jpg|link=File:Position3.jpg]] | [[File:Position3.jpg|link=File:Position3.jpg]] | ||
</loop_figure> | </loop_figure> | ||
| Line 35: | Line 35: | ||
<hr /> | <hr /> | ||
<br /> | <br /> | ||
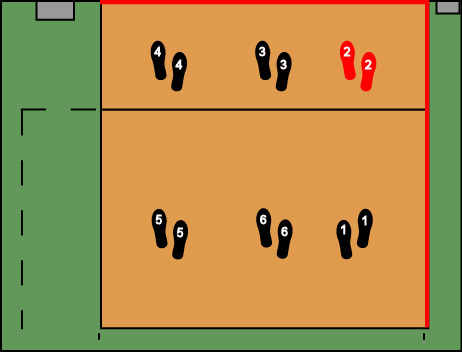
<loop_figure title="Position 2" description="Position 2 closer to the right | <loop_figure title="Position 2" description="Position 2 closer to the right side line than position 3 and closer to the center line than positon 1."> | ||
[[File:Position2.jpg|link=File:Position2.jpg]] | [[File:Position2.jpg|link=File:Position2.jpg]] | ||
</loop_figure> | </loop_figure> | ||
| Line 42: | Line 42: | ||
<br /> | <br /> | ||
<loop_area type="annotation">Knowing who is the setter and the opposite hitter helps to determine | <loop_area type="annotation">Knowing who is the setter and the opposite hitter helps to determine whether there is a positional fault or not (e.g. setter 3). Between the two players, two other players must line up in the rotation.</loop_area> | ||
<br /> | <br /> | ||
<hr /> | <hr /> | ||
In the following chapter, the setter's positions and typically | In the following chapter, the setter's positions and typically occurring position faults are explained: | ||
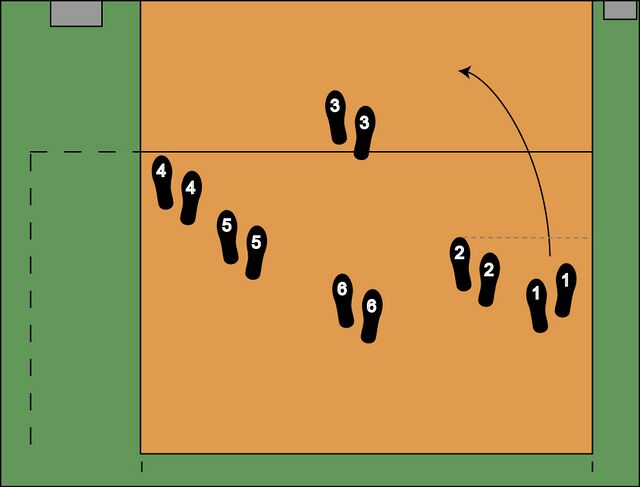
==== Setter 1 ==== | ==== Setter on position 1 ==== | ||
<loop_figure title="Typical line-up with the setter on position 1"> | <loop_figure title="Typical line-up with the setter on position 1"> | ||
[[File:Laeufer1.jpg|640px|link=File:Laeufer1.jpg]] | [[File:Laeufer1.jpg|640px|link=File:Laeufer1.jpg]] | ||
</loop_figure> | </loop_figure> | ||
'''Focus of the second referee:'''<br /> | |||
Position 4 has to be closer to the center line than positon 5. Make sure to have an eye on the setter, who might be running early and end up closer to the center line than position 2 at the service. | |||
<br /> | <br /> | ||
<hr /> | <hr /> | ||
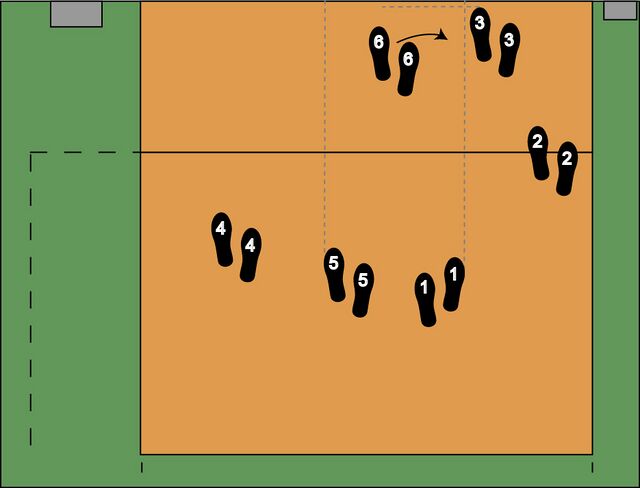
==== | ==== Setter on position 6 ==== | ||
<loop_figure title="Typical line-up with the setter on position 6"> | <loop_figure title="Typical line-up with the setter on position 6"> | ||
[[File:Laeufer6.jpg|640px|link=File:Laeufer6.jpg]] | [[File:Laeufer6.jpg|640px|link=File:Laeufer6.jpg]] | ||
</loop_figure> | </loop_figure> | ||
'''Focus of the second referee:'''<br /> | |||
The setter on position 6 has to be "between" positions 1 and 5 and further away from the net than position 3. | |||
<br /> | <br /> | ||
<hr /> | <hr /> | ||
==== | ==== Setter on position 5 ==== | ||
<loop_figure title="Typical line-up with the setter on position 5"> | <loop_figure title="Typical line-up with the setter on position 5"> | ||
[[File:Laeufer5.jpg|640px|link=File:Laeufer5.jpg]] | [[File:Laeufer5.jpg|640px|link=File:Laeufer5.jpg]] | ||
</loop_figure> | </loop_figure> | ||
'''Focus of the second referee:'''<br /> | |||
Make sure the setter on position 5 is further away from the center line than position 4 and, at least with one part of the foot, closer to the left side line than position 6. In addition, position 3 has to be closer to the center line than position 6. <br /> | |||
<br /> | |||
<hr /> | <hr /> | ||
==== | ==== Setter on position 4 ==== | ||
<loop_figure title="Typical line-up with the setter on position 4"> | <loop_figure title="Typical line-up with the setter on position 4"> | ||
[[File:Laeufer4.jpg|640px|link=File:Laeufer4.jpg]] | [[File:Laeufer4.jpg|640px|link=File:Laeufer4.jpg]] | ||
</loop_figure> | </loop_figure> | ||
'''Focus of the second referee:'''<br /> | |||
Focus on the setter, who might be running early and, therefore, make position 3 closer to the left side line than position 4. Sometimes the opposite hitter, position 1, lines up incorrectly, somewhere between position 5 and 6. | |||
<loop_media type="video" title="Positional fault, setter on position 4" description="The opposite hitter (#12) should have been closer to the side line than the libero player (#10)" render="false"> | |||
<loop_media type="video" title=" | |||
{{#ev:youtube|OTPQvPmRlqE|640}} | {{#ev:youtube|OTPQvPmRlqE|640}} | ||
</loop_media> | </loop_media> | ||
| Line 90: | Line 86: | ||
<hr /> | <hr /> | ||
==== | ==== Setter on position 3 ==== | ||
<loop_figure title="Typical line-up with the setter on position 3"> | <loop_figure title="Typical line-up with the setter on position 3"> | ||
[[File:Laeufer3.jpg|640px|link=File:Laeufer3.jpg]] | [[File:Laeufer3.jpg|640px|link=File:Laeufer3.jpg]] | ||
</loop_figure> | </loop_figure> | ||
'''Focus of the second referee:'''<br /> | |||
The opposite hitter on position 6 has to be "between" the players on position 5 and 1. The player on positon 2 has to be closer to the center line than position 1. | |||
<br /> | <br /> | ||
<hr /> | <hr /> | ||
==== | ==== Setter on position 2 ==== | ||
<loop_figure title="Typical line-up with the setter on position 2"> | <loop_figure title="Typical line-up with the setter on position 2"> | ||
[[File:Laeufer2.jpg|640px|link=File:Laeufer2.jpg]] | [[File:Laeufer2.jpg|640px|link=File:Laeufer2.jpg]] | ||
</loop_figure> | </loop_figure> | ||
'''Focus of the second referee:'''<br /> | |||
The player on position 4 has to be closer to the left side line than position 3. Position 3 has to be closer to the center line than position 6.<br /> | |||
<br /> | |||
<hr /> | <hr /> | ||
Revision as of 10:51, 11 January 2020
It is the second referee's duty to check on the positions of the receiving team.
The feet of the players are relevant for determining whether there is a positional fault or not. The players have to be lined up correctly at the service hit.
Explanation of the positions
Knowing who is the setter and the opposite hitter helps to determine whether there is a positional fault or not (e.g. setter 3). Between the two players, two other players must line up in the rotation.
In the following chapter, the setter's positions and typically occurring position faults are explained:
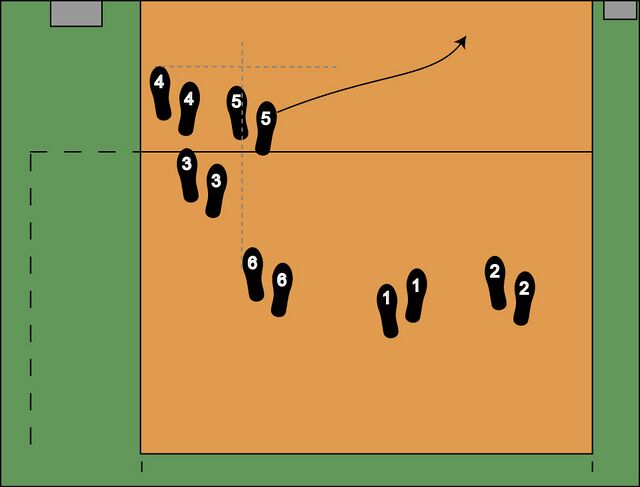
Setter on position 1
Focus of the second referee:
Position 4 has to be closer to the center line than positon 5. Make sure to have an eye on the setter, who might be running early and end up closer to the center line than position 2 at the service.
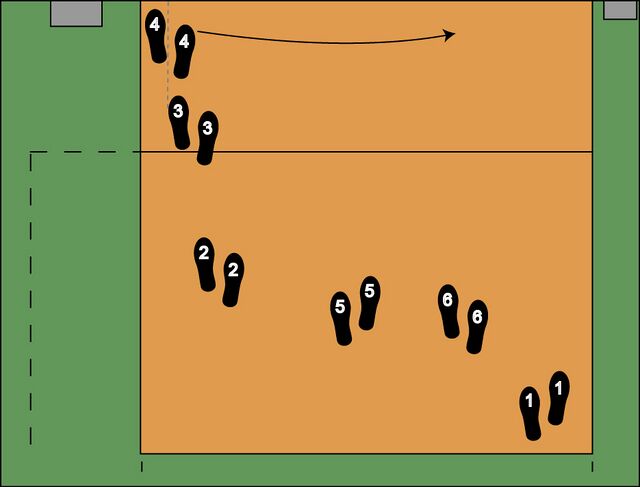
Setter on position 6
Focus of the second referee:
The setter on position 6 has to be "between" positions 1 and 5 and further away from the net than position 3.
Setter on position 5
Focus of the second referee:
Make sure the setter on position 5 is further away from the center line than position 4 and, at least with one part of the foot, closer to the left side line than position 6. In addition, position 3 has to be closer to the center line than position 6.
Setter on position 4
Focus of the second referee:
Focus on the setter, who might be running early and, therefore, make position 3 closer to the left side line than position 4. Sometimes the opposite hitter, position 1, lines up incorrectly, somewhere between position 5 and 6.
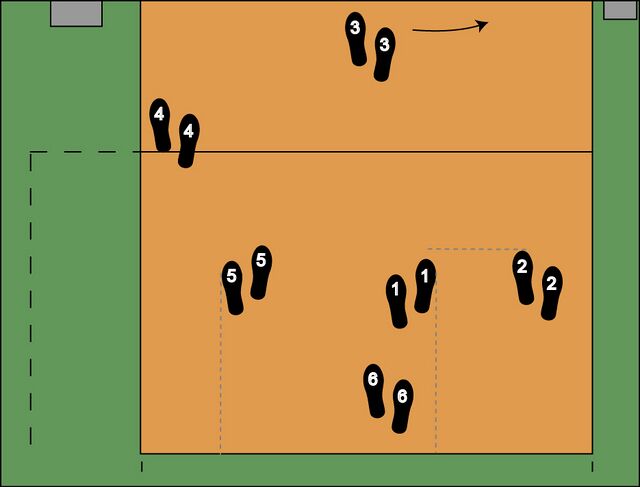
Setter on position 3
Focus of the second referee:
The opposite hitter on position 6 has to be "between" the players on position 5 and 1. The player on positon 2 has to be closer to the center line than position 1.
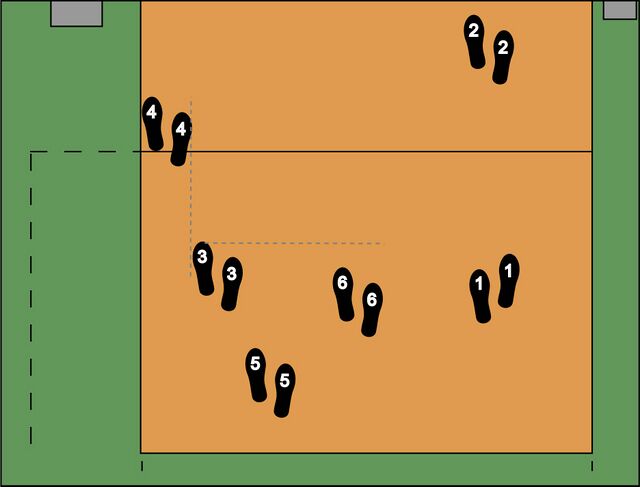
Setter on position 2
Focus of the second referee:
The player on position 4 has to be closer to the left side line than position 3. Position 3 has to be closer to the center line than position 6.
Texts and pictures are published under:
![]()
Videos are published under:
![]()
