List of figures
| Fig. 1: | How to record AC1 and AC2 on the scoresheet. 3.8 Teams | |
 | Fig. 2: | The court is surrounded by the free zone and is bounded by a perimeter (e.g., boards), the scorer's table, and the team benches. 3.10 Competition and Playing area |
 | Fig. 3: | The warm-up areas can be behind the bench or outside the free zone in the corner, in any case, the same for both teams. The home team specifies where they are. Both teams have to comply with it. 3.10 Competition and Playing area |
 | Fig. 4: | First referee 4.1 First referee |
 | Fig. 5: | Results column 4.1.2 Duties of the first referee |
 | Fig. 6: | Second referee 4.2 Second referee |
 | Fig. 7: | Results column 4.2.2 Duties of the second referee |
| Fig. 8: | Positions in a 2-line-judge-system (left) and a4-line-judge-system (right) 4.4 Line judges | |
 | Fig. 9: | 2-line-judge-system 4.4 Line judges |
 | Fig. 10: | 2-line judge system - positions in time-outs 4.4 Line judges |
 | Fig. 11: | 2-line judge system - positions in set intervals 4.4 Line judges |
 | Fig. 12: | 4-line judge system 4.4 Line judges |
 | Fig. 13: | 4-line judge system - positions in time-outs 4.4 Line judges |
 | Fig. 14: | 4-line judge system - positions in technical time-outs 4.4 Line judges |
 | Fig. 15: | 4-line judge system - positions in set intervals 4.4 Line judges |
| Fig. 16: | Match information 5.1 Preparation | |
 | Fig. 17: | Filled player list 5.1 Preparation |
 | Fig. 18: | The libero has to be recorded in the players and the libero players section. 5.1 Preparation |
| Fig. 19: | Recording AC1 and AC2 in the older and newer score sheets 5.1 Preparation | |
| Fig. 20: | Match data 5.1 Preparation | |
| Fig. 21: | Assignment of A and B 5.2 After the coin toss | |
 | Fig. 22: | Signatures on the player list 5.2 After the coin toss |
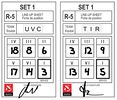
 | Fig. 23: | Line-up sheets 5.2 After the coin toss |
| Fig. 24: | Set 1 - after the coin toss 5.2 After the coin toss | |
 | Fig. 25: | Results - after the coin toss 5.2 After the coin toss |
| Fig. 26: | Set 1 - UVC gains three points 5.3 Recording points | |
| Fig. 27: | Set 1 - UVC loses its right to serve 5.3 Recording points | |
| Fig. 28: | Set 1 - Tirol gains 4 points and loses the right to serve at 3 : 5 5.3 Recording points | |
| Fig. 29: | Team time-out Tirol 5.4 Time-Out | |
| Fig. 30: | Substitution Tirol 5.5 Substitutions | |
| Fig. 31: | Bringing a player back by Tirol 5.5 Substitutions | |
 | Fig. 32: | Improper Request - Improper Request team A 5.6 Improper Request |
 | Fig. 33: | Delay sanctions 5.7 Recording sanctions |
 | Fig. 34: | Misconduct sanctions 5.7 Recording sanctions |
| Fig. 35: | Circling of a point awarded due to a red card 5.7 Recording sanctions | |
| Fig. 36: | Control of the carryover (black) and the formed totals (red) on the score sheet after the end of the game 5.8 After the match | |
| Fig. 37: | Incidents during the game or protests are written under remarks 5.8 After the match | |
| Fig. 38: | Signatures after the match 5.8 After the match | |
 | Fig. 39: | External sector, crossing space and space below the net 6.2 Crossing and external space |
 | Fig. 40: | Balls through the crossing space 6.2 Crossing and external space |
 | Fig. 41: | Balls through the external space 6.2 Crossing and external space |
 | Fig. 42: | No fault, because part of the foot is still on the center line 6.3 Penetration into the opponent's court |
 | Fig. 43: | No fault, because the foot does not touch the opponent's court 6.3 Penetration into the opponent's court |
 | Fig. 44: | No fault, because part of the foot is still above the center line 6.3 Penetration into the opponent's court |
 | Fig. 45: | No fault, because the feet are still on the player's own side 6.3 Penetration into the opponent's court |
 | Fig. 46: | Fault, because the whole foot touches the opponent's court 6.3 Penetration into the opponent's court |
 | Fig. 47: | Position 1 6.4 Positions |
 | Fig. 48: | Position 6 6.4 Positions |
 | Fig. 49: | Position 5 6.4 Positions |
 | Fig. 50: | Position 4 6.4 Positions |
 | Fig. 51: | Position 3 6.4 Positions |
 | Fig. 52: | Position 2 6.4 Positions |
 | Fig. 53: | Typical line-up with the setter on position 1 6.4 Positions |
 | Fig. 54: | Typical line-up with the setter on position 6 6.4 Positions |
 | Fig. 55: | Typical line-up with the setter on position 5 6.4 Positions |
 | Fig. 56: | Typical line-up with the setter on position 4 6.4 Positions |
| Fig. 57: | Typical line-up with the setter on position 3 6.4 Positions | |
 | Fig. 58: | Typical line-up with the setter on position 2 6.4 Positions |
 | Fig. 59: | Reaching beyond the net 6.5.1 Reaching beyond the net |
 | Fig. 60: | Reaching beyond the net 6.5.1 Reaching beyond the net |
 | Fig. 61: | Reaching beyond the net 6.5.1 Reaching beyond the net |
 | Fig. 62: | Reaching beyond the net 6.5.1 Reaching beyond the net |
 | Fig. 63: | Blocking fault 6.5.2 Blocking fault |
 | Fig. 64: | Blocking fault 6.5.2 Blocking fault |
 | Fig. 65: | Blocking fault 6.5.2 Blocking fault |
 | Fig. 66: | Blocking fault 6.5.2 Blocking fault |
 | Fig. 67: | Attack hit fault 6.5.3 Attack hit faults |
 | Fig. 68: | Attack hit fault 6.5.3 Attack hit faults |
 | Fig. 69: | Attack hit fault 6.5.3 Attack hit faults |
 | Fig. 70: | Attack hit fault 6.5.3 Attack hit faults |
 | Fig. 71: | Different types of attacks 6.8 Attacks |
 | Fig. 72: | Joust 6.10 Joust |
 | Fig. 73: | The libero has to be recorded in the libero players section. 6.12 Libero |
 | Fig. 74: | Replacement zone 6.12 Libero |
 | Fig. 75: | Substitution zone 6.13 Substitution |
 | Fig. 76: | Line-up sheet 11.2 Duties of a coach |